Tabata…
Sounds cool, yes? Maybe a little intimidating, but hey, it was a sweet last name and now a fun word. Why not?
Tabata is a type of workout created by some health-crazy Japanese man who knew his stuff. He ran tests and experiments and found that high-intensity interval training increased both aerobic and anaerobic systems (two different types of exercise that collectively benefit all of your different muscles types). Basically, interval training is fantastic. It revs up your metabolism and helps your muscles to stay active, even after you stop working out, to burn calories and boost fat loss.
I’ve recently been teaching Tabata as a half-hour exercise class, and my clients love love love it! Originally, Tabata was meant as a 4-minute all-out cardio blast, where you max out all effort during your set and keel over in exhaustion and satisfaction at the end. Now don’t go getting any ideas that you should pace yourself when you try this workout, but it is going to be challenging. Try not to cheat. The harder you work, the sooner that second wind comes around… right?
So here’s the deal:
Each set is 4 minutes total.
6 sets; 2 exercises in each set.
That’s 4 rounds of each exercise in a set, for 8 total rounds in a set.
Got it? No? Yeah, that explanation was about as Japanese as the man who made this up. Follow this:
Do each exercise for 20 seconds and rest 10 seconds. For example, you would do (1) for 20 seconds, rest 10 seconds, do (2) for 20 seconds, rest 10 seconds, do (1) 20 seconds, etc. Each exercise will be done 4 times before moving on to the next set, for a total of 4 minutes per set.
Note: Any exercise with a * next to it has a how-to picture posted underneath the exercises. All other exercises you may not know (make sure you have proper form!) are easily found in a Google search.
HARD
1. Jumping Jacks
2. Squatted Punch (stay low the whole time!)*
1. Mountain Climbers
2. Lunge with Dumbbell Bicep Curls
1. Burpees/Squat Thrust
2. Bridge (aka hip raise) to Crunch*
1. Invisible Jump Rope
2. V-Raise with Curtsey*
1. Lunge Jumps (go down as far as you can!)
2. Squat Pulse holding weight
1. Push-ups/Diamond Push-ups
2. Squat Kick-backs*
EASY
1. In and Outs (shuffle your feet in and out quickly)
2. Standing Punch
1. High Knees
2. Front Raise/T-Raise*
1. Squat Jacks (stay low!)
2. Hip Raises aka Bridge
1. Invisible Jump Rope
2. V-Raise with Curtsey*
1. Lunge Walk Jumps (for less impact)
2. Squat Pulse
1. Push-ups/Diamond Push-ups
2. Backward Leg Raises
No weights? Try the workout below, or hold a couple laundry bottles, heavy bags, etc. for the ones above!
NO WEIGHTS
1. Jumping Jacks
2. Push-Ups
1. Mountain Climbers
2. Diamond Push-Ups
1. Squat Jumps
2. Bridge to Crunch*
1. Squat Jacks (stay low!)
2. Alternating lunges
1. Burpees/Squat Thrusts
2. “Kettlebell” (i.e. something heavy) Swing
1. Invisible Jump Rope
2. Squat to Press (just use something heavy)
Again, do each exercise for 20 seconds and rest 10 seconds. For example, you would do (1) for 20 seconds, rest 10 seconds, do (2) for 20 seconds, rest 10 seconds, do (1) 20 seconds, etc. Each exercise will be done 4 times before moving on to the next set, for a total of 4 minutes per set.
Doing all 6 sets, and resting 1 minute in between sets will bring your workout to a grand total of 29 minutes. Modify if needed for knee, back, elbow, etc.problems, but don’t modify just because your lungs are burning! They’re supposed to. You can do it! Yes it sucks, and yes you’re breathing heavy, but you’re also sweating yourself to a good mood and fitter, more toned body. Definitely worth it.
V-Raise with Curtsey

V-Raise with Curtsey– Step 1

Curtsey and V-Raise– Step 2

Curtsey and V-Raise– Step 3

Curtsey and V-Raise– Step 4

Curtsey and V-Raise– Step 5. Repeat!
Squatted Punch

Squatted Punch– stay low the whole time

Squatted Punch– stay low the whole time
Front to T-Raise

Front to T-Raise– Step 1

Front to T-Raise– Step 2

Front to T-Raise– Step 3

Front to T-Raise– Step 4

Front to T-Raise– Step 5. Repeat!
Squat Kick-back

Squat Kick-Backs– Step 1

Squat Kick-Backs– Step 2

Squat Kick-Backs– Step 3
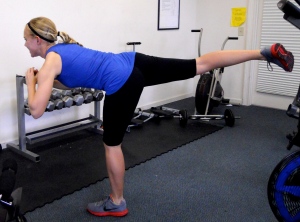
Squat Kick-Backs– Step 4

Squat Kick-Backs– Step 5. Repeat!
Bridge (aka Hip Raise) to Crunch

Bridge to Crunch– Step 1. Think “Up-Down-Crunch-Down”

Bridge to Crunch– Step 2. Think “Up-Down-Crunch-Down”

Bridge to Crunch– Step 3. Think “Up-Down-Crunch-Down”

Bridge to Crunch– Step 4. Think “Up-Down-Crunch-Down”

Bridge to Crunch– Step 5.
Think “Up-Down-Crunch-Down”
And here we go with a complete change in gears to talk about the C word. CUPCAKES! And more importantly, my personal weakness, funfetti cupcakes. Tomorrow is my last practice coaching soccer for 3-5 year-olds. Most know the routine but a few will be surprised tomorrow when they receive shiny medals with their names on them and a yummy cupcake for all their hard work. These kids are my entertainment for the weekend, and it’s so awesome to hear them say “Coach! Coach! Can you show me this move?”. How can you not give a kid a cupcake when you tell him he’s running extra fast today and he shouts “That’s because I’m wearing my Nikes!” (Pose included). So the kids are getting these in the morning…

Cupcakes for the last day of Lil’ Kickers
I’m no artist, but it’s the thought that counts, right? Hey… I used applesauce instead of oil. Almost healthy C-words. Yum.
What kind of things would you like to see on this blog? The more suggestions, the better. And the more input, the more motivation for me to keep writing. Thanks for reading!
Good Things 🙂
FS&JJ


